
Most architectural photographs can be made with a wide-angle lens of about 24mm on a full-frame camera. That focal length covers whole buildings and most interiors without badly stretching proportions at the edges of the frame. If a tilt-shift is used, shifting the lens keeps vertical lines parallel in camera. About 65% of the commissioned images I've made in the past two years were done with a 24mm tilt-shift. It's the lens I consider the best lens for architectural photography.
The positioning of the camera is more important than lens selection. Camera position determines how objects relate to each other in the frame. Focal length is the variable that affects framing, with wide lenses providing a large field of view and longer lenses constraining it. This article covers both, along with distortion, correction, aperture, and other lens considerations that matter when the subject is a building.
Position and Focal Length
Where the camera stands influences how far apart objects appear from each other. Picture a tree on the sidewalk in front of a building. From a distance, the tree and the building appear close together. Move toward them, and they separate, with the tree growing larger and pulling forward from the facade. In person, perception compensates for some of that change. A photograph records it without compensating, so it reads more strongly.
From the same camera position, a 24mm and a 50mm produce the same relative geometry between the tree and the building. The 50mm just includes less of the scene, so the tree and building fill more of the frame. Their relative size and the point where the tree overlaps the facade change only when the camera moves.
This is why moving matters as much as changing lenses. Positioning the camera close to a building with a wide lens exaggerates the difference in scale between the nearest element and everything behind it. Taken to an extreme, this can become proximity distortion, which is covered in more detail in my article on the six most common mistakes in architectural photography. Backing up and using a longer focal length does the opposite. The challenge is finding the spot that is just right.
Compression
Compression is a way of rendering objects at different planes of depth so that they appear closer than they would from a nearer vantage point. It requires both distance from the subject and a narrow field of view. A wide frame that happens to show a distant background is not an example of compression.
When a shot needs more compression, the fix is to physically back up and use a longer lens at the same time. Switching to a longer lens without moving gives a tighter frame of the same view, roughly what cropping the middle of the wide shot would give. Near and far objects keep the same sizes relative to each other, so the framing narrows without the compression, which requires distance too. Backing up with the wide lens alone leaves the subject swimming in the frame.
What's the Best Focal Length for Architectural Photography?
For most architectural work, 24mm on full frame is the most versatile focal length, and 50mm is second.
A normal lens has a focal length close to the diagonal of the format it covers. On full frame, that's about 43mm, which is where the 50mm's reputation as the standard lens comes from. The same focal length will provide a wider view on a larger sensor and a narrower one on a smaller sensor. On a 44x33mm medium-format sensor, a 24mm lens has about the field of view of a 19mm on full frame. On smaller sensors like APS-C, the rule of thumb is to multiply the focal length by 1.5 to get the full-frame equivalent, so a 24mm lens on APS-C has about the same field of view as a 35mm lens on full frame.
Sensor formats are covered in more detail in Cameras for Architectural Photography.
17mm
The 17mm is an ultra-wide lens, and it's the lens to reach for when there's no more room to back up. It can take in a very tall building from relatively close, with plenty of vertical room to spare. The cost is a somewhat distorted appearance. The worst of this is the ship's prow effect, where the upper orthogonals descend sharply and unnaturally.
Counterintuitively, it's most useful in large, open spaces. In a vast space, it can fit grandeur into a single frame without having to get into multi-image stitching. It also works well in a carefully locked-in one-point perspective. I don't use it that much, because it's unworkably wide for most things. That may just be a matter of taste, since plenty of photographers use it more than I do. I carry it because it solves one specific problem so thoroughly. When I do need it, it feels like a cheat code.
Shift-stitching can be another way to get there. Shifting a 24mm side to side or up and down and merging the frames gives roughly the view of a 17mm. It takes a lot of finesse, and it isn't a great way to get the shot.
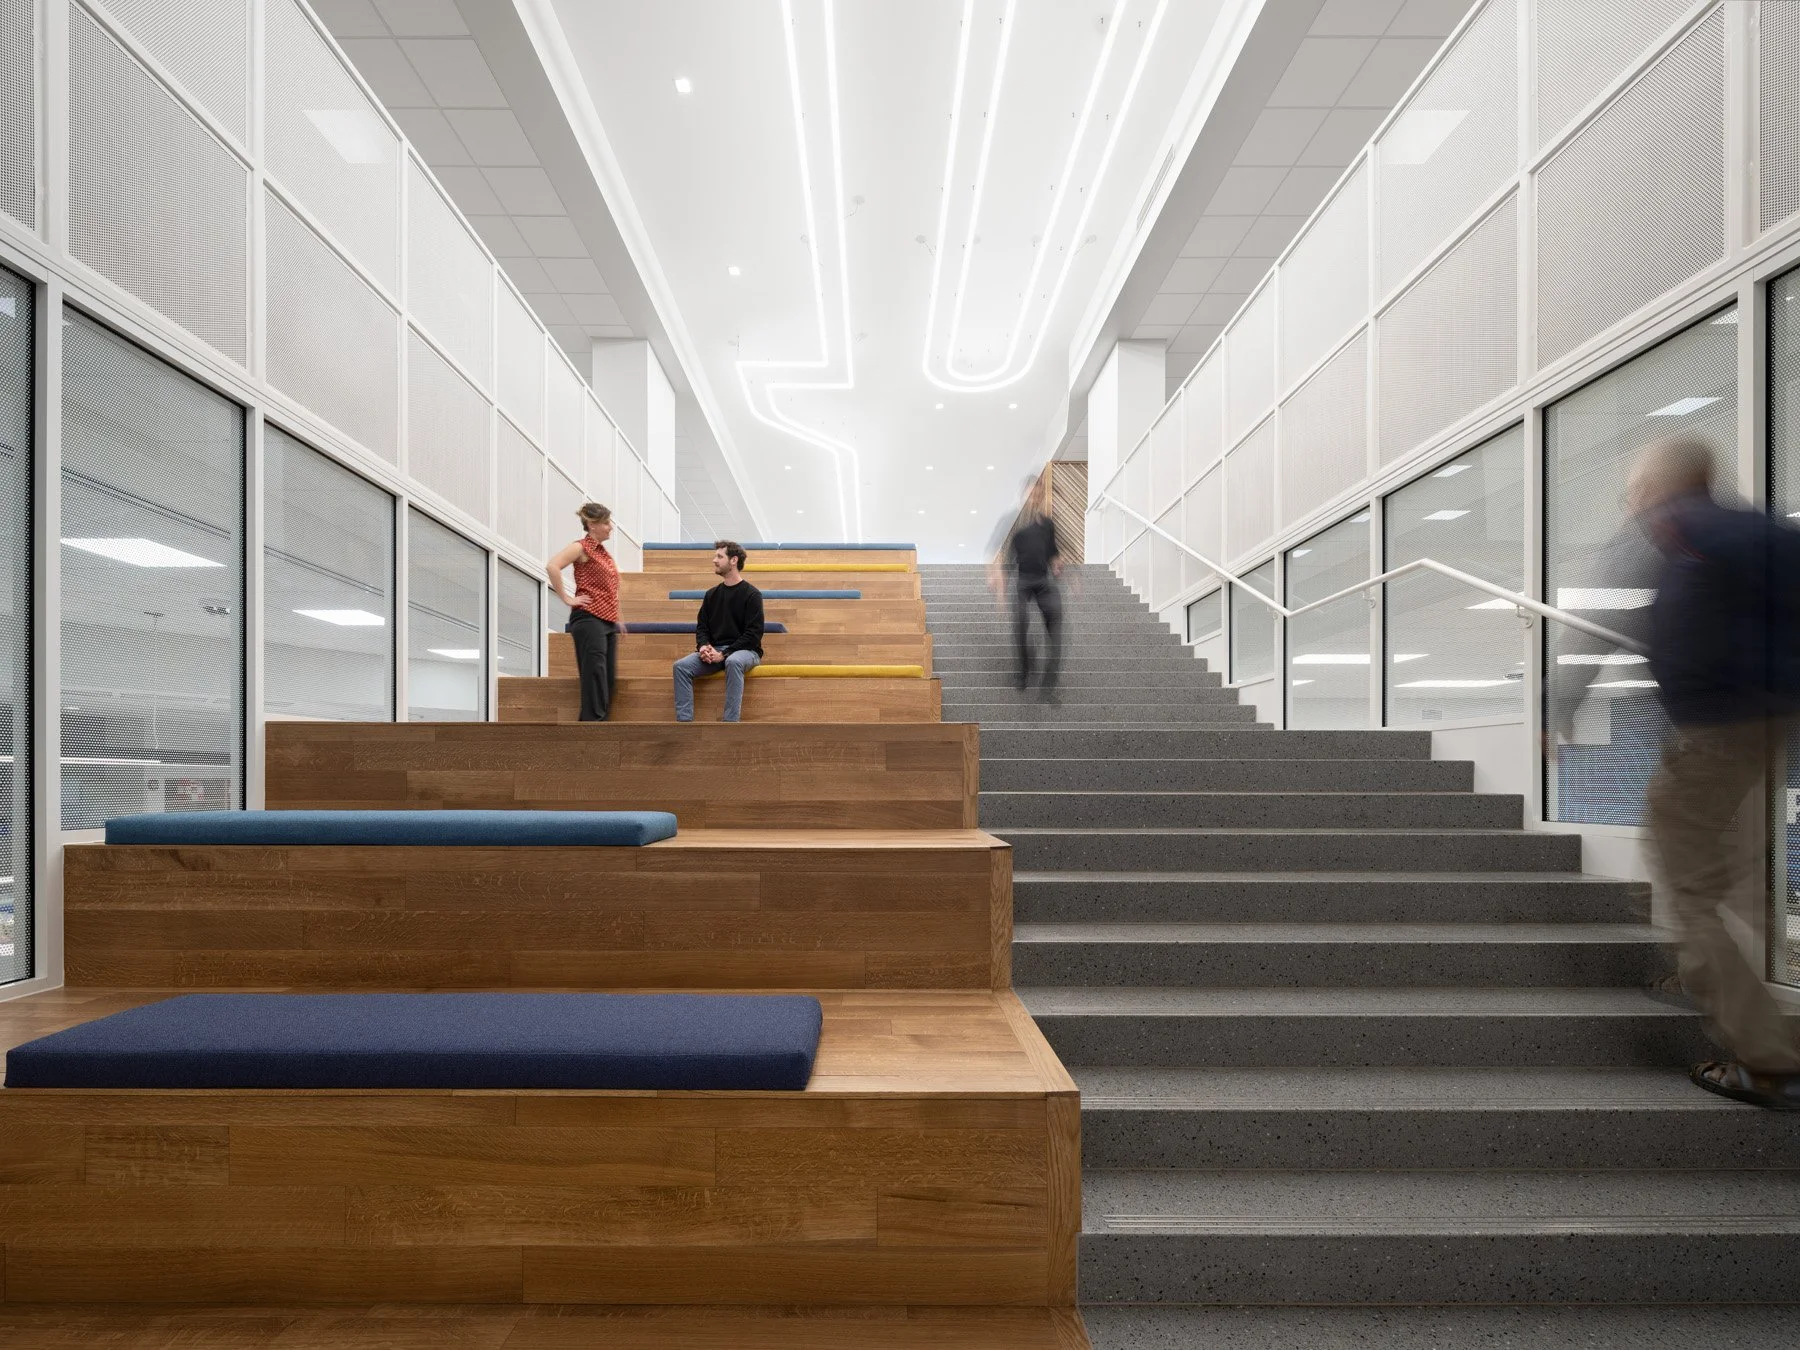
STLCC Florissant Valley Student Center, JEMA, Ferguson MO. One point perspective shot with Fujifilm GFX100s and Canon TS-E 17mm f/4L.
24mm
The 24mm is a great default. It's wide, but it leaves a little room to crop, and it suits the majority of exteriors and interiors. The reasons are covered in great detail in my write-up of the Canon TS-E 24mm f/3.5L II.
50mm
The jump from 24mm to 50mm is significant. The 50 is good for vignettes, which focus on part of a space but keep some sense of its width. With room to back up, it's the lens to pull out for moderate compression. For example, it's useful for making horizontal vignettes of segments of a room.
Depth of field at 50mm is shallower than at 24mm from the same distance, so one must be deliberate about where the plane of focus sits so as not to let critical items become defocused. On the other hand, the 50mm can allow for a pleasing amount of isolation if that's required.
90mm
The 90mm is for tight detail views and highly compressed vignettes. It's also a macro lens, so it can go from across a room to a few inches from a texture, a lamp, or a sink fixture without a lens change. Depth of field is shallow at this focal length, so tilt matters more here than on any other lens in the kit.
Shift is the main limitation. At 90mm, the same amount of shift moves the view through a much smaller angle than at 24mm, so it does less to correct verticals. I use the Canon Mark I 90. Canon's wide-angle Mark Is are awful, which is why my other three are Mark IIs, but the longer Mark I holds up.
Which Wide-Angle Lenses Suit Architecture?
For most architecture, a moderate wide angle around 24mm on full frame is a better fit than an ultra-wide. It covers a building or a room without badly stretching whatever sits near the edges of the frame.
Rectilinear wide-angle lenses keep straight lines straight, but they stretch everything toward the edges. Round objects turn oval, and furniture near the corners grows wider. It's just what happens on superwide lenses, and it gets worse the wider you go.
Software can't undo it cleanly. While tools in Capture One, DxO ViewPoint, or Photoshop offer algorithms for deformation, they are fundamentally compromises. Rectilinear projection requires edge stretching to keep straight lines straight. Trying to fix the stretched corners in software warps the projection nonlinearly, which can easily introduce subtle wave distortion into nearby elements. It's whack-a-mole.
The 17mm is a poor choice in small rooms. An ultra-wide used on a small space makes it look tunnel-like and distorted. The spatial relationship from foreground to background is off. The convergence is too pronounced, and it happens too fast.
The inclusion of people in the frame shouldn't affect the choice of lens. Compose the frame first and add people afterward, as described in my article on people in architectural photography. On a wide lens, keep them away from the edges, where they'd be stretched. But sometimes they have to be there, and so be it.
Which Wide-Angle Lenses Have the Least Distortion?
Symmetrical large-format lenses have the least distortion, followed by modern mid-wide primes, then Canon's tilt-shift lenses.
Distortion warps the whole frame. With barrel distortion, the frame bulges outward from the center like the side of a barrel, and straight lines near the edges curve outward. It's most common in wide-angle lenses. The opposite is pincushion distortion, where the corners stretch outward and the middle of each edge pinches in, so straight lines curve inward toward the center. This is an affliction of telephotos. Mustache distortion combines the two, bulging near the center and pinching toward the edges, so straight lines take on a wave.
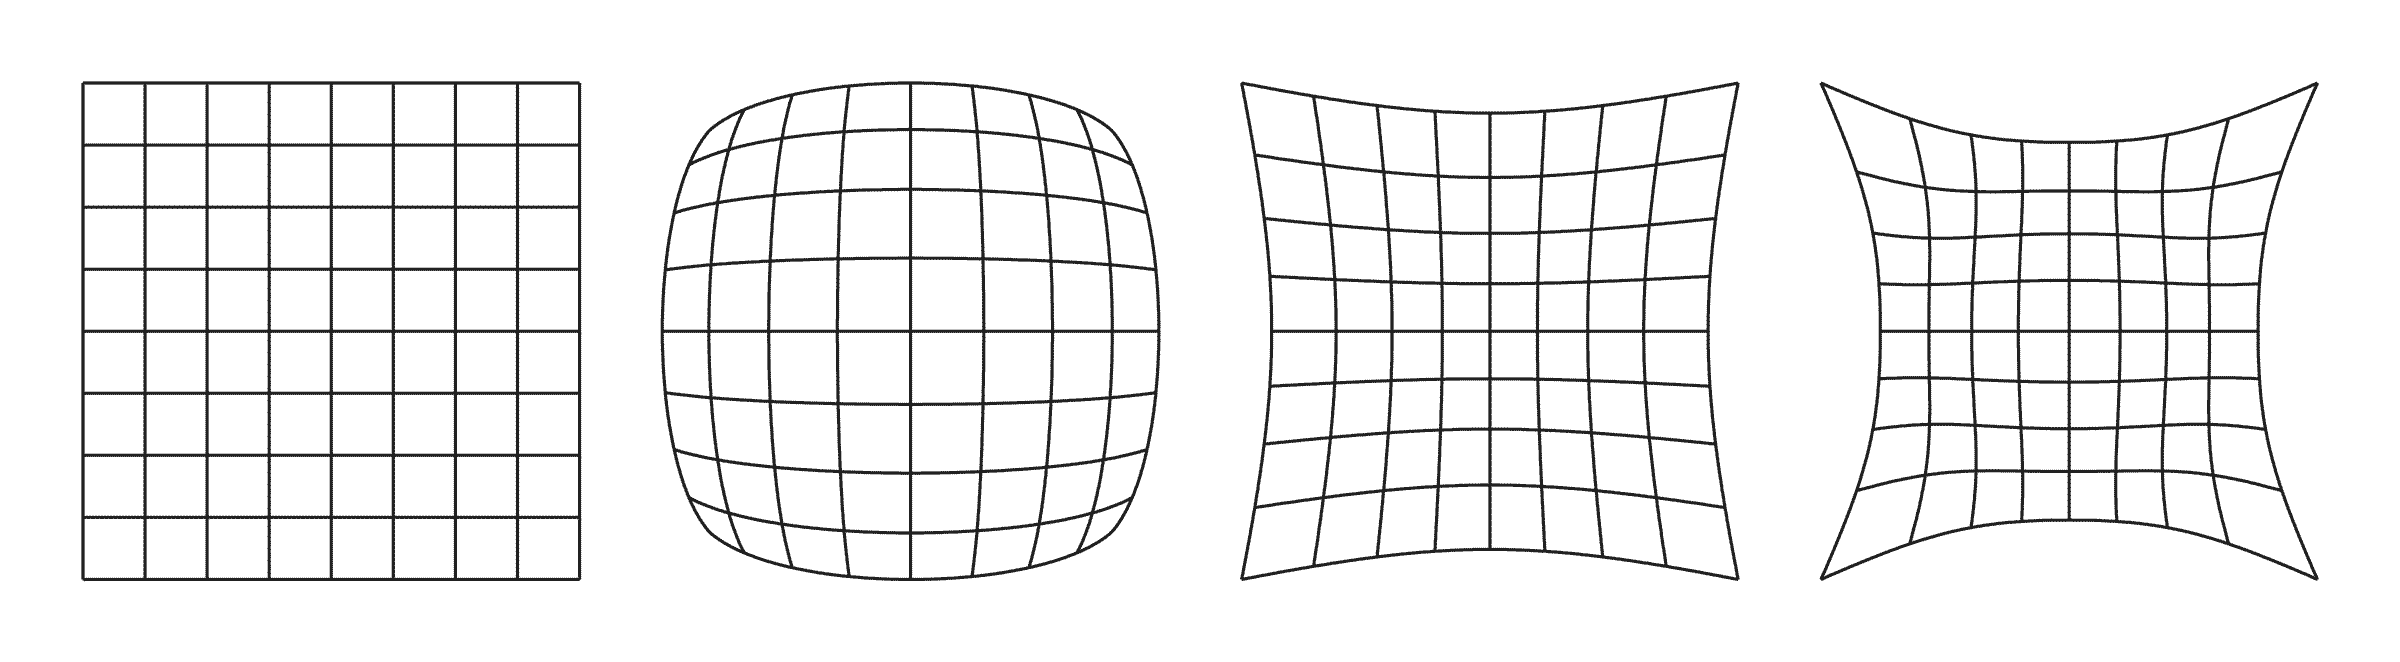
Types of distortion. From left: none, barrel, pincushion, mustache.
Large-format lenses
Large-format wide angles are nearly symmetrical, with similar groups of elements on either side of the aperture, and that symmetry cancels out most distortion. SLR wide angles can't use that design, because they need room to clear the mirror box, so they use retrofocus designs that are harder to correct. If you want the least distortion possible, go get a Rodenstock Apo-Grandagon and pop it on a view camera. This gets very expensive very quickly.
Modern mid-wide primes
Newer wide-angle designs are better corrected than older ones, but all of them still need some software correction. For regular primes and zooms, Lightroom and third-party software apply it automatically with lens profiles, so distortion is rarely the deciding factor anymore.
Min-maxing toward zero distortion means looking at measured results on a site like DXOMARK. As of this writing, the wide lens with the best results there is the Zeiss Batis 25mm f/2 for Sony, at 0.5% distortion.
Canon tilt-shifts
Among the tilt-shift wide angles I've used, Canon's have the least distortion, and it isn't close. That matters more for tilt-shift lenses than for any other kind, because profiles don't apply to them, so whatever distortion the lens has stays in the image. Shifting also moves the frame toward the edge of the image circle, where color fringing and vignetting get worse. When that's a problem, it can be fixed while retouching in Photoshop. There's more detail in this review of the TS-E 24mm. If you're shooting film on a Canon body, the TS-E 24 is a great choice.
The edge stretching described in the previous section is a separate issue. A lens can be free of distortion and still stretch the corners, because the stretching comes from rectilinear projection.
Tilt-Shift or Software Correction?
Software can correct converging verticals, and many photographers who do what I do no longer use tilt-shift lenses at all. I still do, because a tilt-shift lens gets me much closer to the final composition in one shot.
Some photographers claim that tilt-shift lenses or large-format cameras slow them down and make them more intentional. Personally, I don't think like this. Deciding where to stand doesn't take me long, and I'm not interested in advocating for slow, deliberate work. I can be patient when I have to, but I like to get things done and move along. A tilt-shift gives me fine control over the plane of focus and the ability to move the frame up and down, the same things a view camera offers. Shooting with a regular 28mm prime makes me just as happy, but the images come out differently, and both modes have their place.
Software correction works better the smaller the correction. Two habits help. First, keep the camera level side to side, even when it's tilted up. If it's tilted in both directions, the correction has to work across two axes instead of one. When handholding, it helps to display the in-camera level in the frame. The drone needs the same care, with different mechanics.
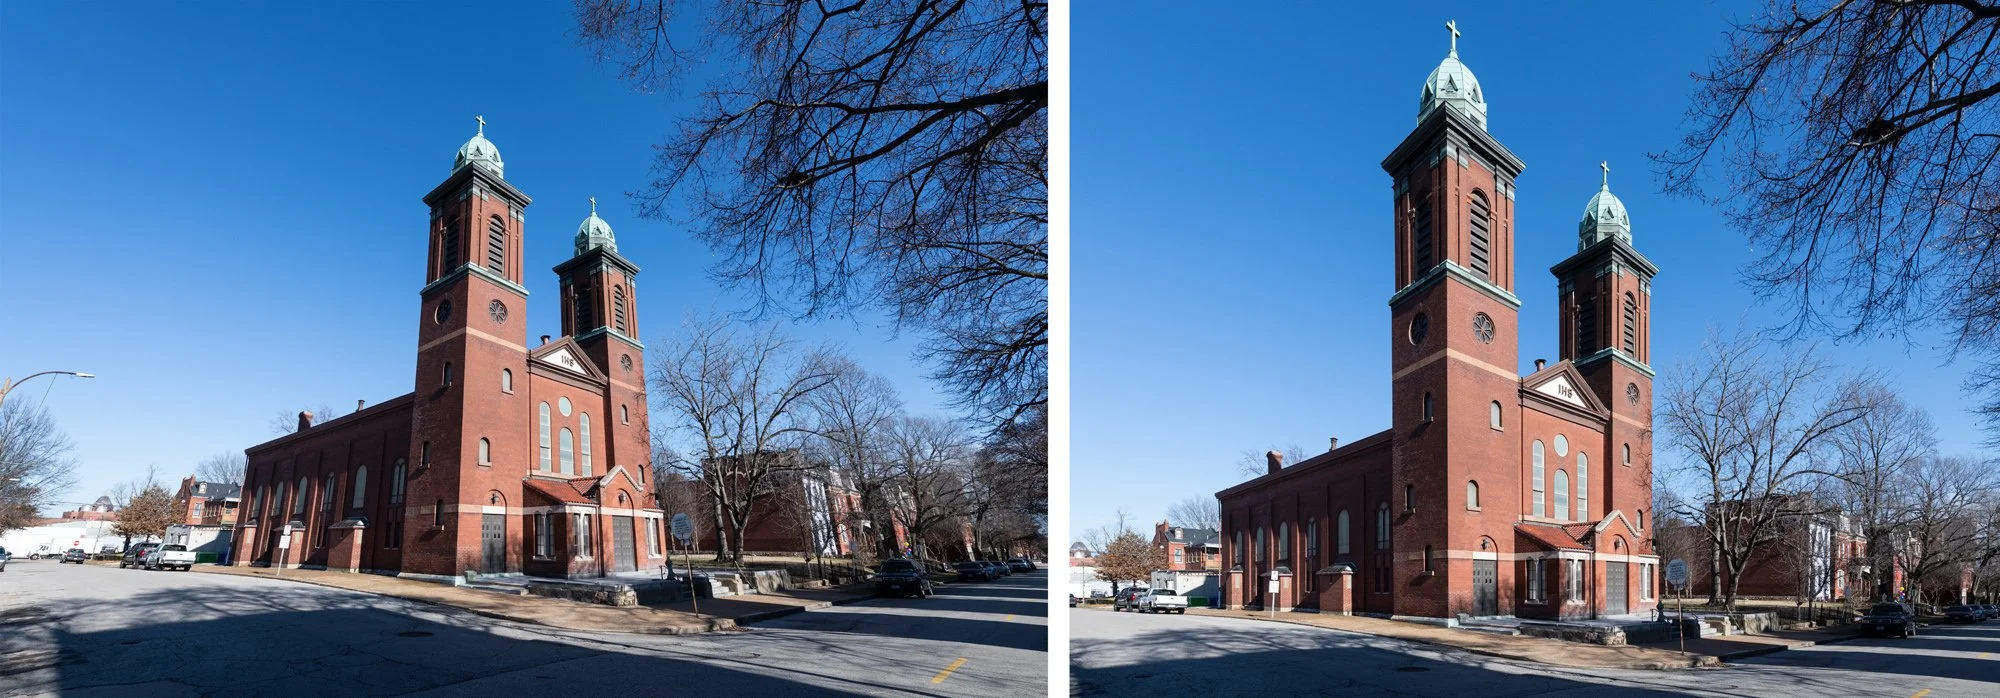
Example of perspective correction in software.
Second, shoot loose and leave room to crop. Correction pulls in the edges of the frame, and you'll need the space. Correcting in software costs a little image quality and adds a small extra step later, but it's mostly fine. A building corrected in software doesn't necessarily look any different from one shot with shift. I prefer not to do it on jobs, though I know plenty of photographers who do.
With a tilt-shift, the frame is already level and composed on the screen. If a client or art director is on site, they can see the finished shot right away. Asking them to judge a tilted wide frame on the promise that it will look right after correction and cropping adds friction.
That said, do whatever works for you. For more on how shift and tilt work, see Tilt-Shift Lenses for Architectural Photography.
Are Zooms Good for Architectural Photography?
Zooms can be very good lenses, and for some architectural work they're the right choice. Their drawbacks are mostly practical.
Wide zooms
A wide zoom like a Nikkor 14–24mm can be very sharp. Shot at its widest, it leaves plenty of room to correct verticals in software. It's useful for real estate, where you can dial in the exact edges of the frame and get the shot in one exposure, and it works handheld while walking around.
The lens is long and bulky, and it can't take screw-in filters without a special adapter. Circular polarizers get a lot of use in architectural photography, and a massive filter on the front of a lens is a pain to carry around. When portability matters, a small wide prime makes more sense.
Mounted on a tripod, with the verticals corrected afterward, a wide zoom can stand in for a tilt-shift. People do it all the time. On a paid job, I prefer to see the shot close to exact in camera, so I know I got it right.
Standard zooms
A 24–70mm is a workhorse lens for events. For architecture, I've found that these have more distortion and edge softness than comparable primes. A newer version of that focal range would probably be fine. Unlike wide zooms, filters will fit, but these will still be bulky pieces of gear to lug around.
Telephoto zooms
For distant details, a long lens like an 80–200mm zoom or a 300mm prime can be incredibly useful. That's planned work, where you already know how much space you have and what you need. Neither is a walk-around lens.
A 200mm is underrated for architecture. It's good for high compression, abstract or tight details, streetscapes, and some material close-ups. Long focal lengths are used far less often than wider lenses. That has more to do with expectations and conventions than anything else.
Few architectural applications need anything longer than 200mm, and even that is probably overkill.
Zoom blindness
Being able to change focal length without moving can lead to a kind of laziness, where you never really choose the right place to stand. I call it zoom blindness. As described in Position and Focal Length, position comes first, and a zoom makes it easy to skip that step. The result usually involves being too close and too wide.
What's the Best Aperture for Architectural Photography?
I start at f/11 and change it only when I have a reason to. Most of my finished images are made between f/8 and f/11, and I rarely stop down past f/14. Of course, this depends on the lens, but the idea is to start close to the center of its aperture range. On my tilt-shifts, that's also where they're sharpest in the corners.

Illustration of variable aperture on a 75mm Rodenstock Grandagon-N lens. From left: f/5.6, f/13, f/45.
Since most architectural work happens around f/8 to f/11, there's little reason to pay for, or carry, a fast f/1.4 lens. Some common reasons to move off the center aperture value are to stop down a bit for a closer subject or to open up to separate a single subject from the background.
When stopping down isn't enough, tilting the lens swings the plane of focus so a receding plane can be sharp end to end. This is an advanced move that introduces additional problems. I cover this further in Tilt-Shift Lenses for Architectural Photography.
Where to Start
What to buy first depends on what you're shooting. The following focal lengths assume a full-frame body. On APS-C, divide by 1.5 to find the lens with the same view, so the 28mm view takes about an 18mm lens.
A 28mm prime suits photographing buildings casually, while traveling or walking around. It's a good standard wide, and if you plan to crop a little, you can do quite a bit with it. On a small body, it makes a good run-and-gun setup that's easy to handhold even indoors and a little stealthier when sneaking shots. In a crowd, it's possible to get street-photography-style views from inside the fray. That setup is light and versatile enough to take on a long walk and come back with a wide variety of views.
Real estate calls for a 12–24mm or something similar. The convention there is to shoot very wide, and one has to do it to please clients because they expect it. Unfortunate, but true.
To photograph architecture for designers and builders, the first lens to get is a 24mm tilt-shift. The reasons are explained in this discussion of the Canon TS-E 24mm f/3.5L II.
Whatever you buy, where you choose to stand will matter more than what's on the camera.